Elements code tutorial
Advanced examples
Manually creating a transaction, manually issuing an asset, using asset contract hash and asset registration.
Issuing an asset to a multi-sig, spending from a multi-sig and reissuing from a multi-sig.
Issuing an asset and using the issueasset command’s contract hash argument to enable registration with the Blockstream Liquid Asset Registry.
Verify an output’s asset and amount values using the blinding factors.
You can use this example to prove to parties not involved in the transaction that an Elements Confidential Transaction sent a certain amount of a certain asset.
You can do this using the Blockstream Explorer or by using the provided script. The script reveals the values are correct by using an Elements node as a trusted source.
Example 1: Manually creating a transaction, manually issuing an asset.
The code below shows you how to carry out the following actions within Elements:
-
Creating a transaction manually (createrawtransaction) using an Issued Asset.
-
Creating an asset issuance manually (rawissueasset).
Save the code below in a file named advancedexamplesraw.sh and place it in your home directory.
To run the code, open a terminal in your $HOME directory and run:
bash advancedexamplesraw.sh
You can run each of the examples individualy by passing in the following command line arguments:
‘RTIA’ for raw transaction using an issued asset
‘RIA’ for raw issuance of an asset
For example, to run the raw issuance example only:
bash advancedexamplesraw.sh RIA
If you do not pass an argument in, both examples will run.
The examples have been tested with version 0.18.1.12 of Elements.
Note: If you want to run some of the steps automatically and then have execution stop and wait for you to press enter before continuing one line at a time: move the trap read debug statement down so that it is above the line you want to stop at. Execution will run each line automatically and stop when that line is reached. It will then switch to executing one line at a time, waiting for you to press return before executing the next command. Remove it to run without stopping.
You will see that occasionally we will use the sleep command to pause execution. This allows the daemons time to do things like stop, start and sync mempools.
There is a chance that the “ and ‘ characters may not paste into your advancedexamplesraw.sh file correctly, so type over them yourself if you come across any issues executing the code.
#!/bin/bash
set -x

#
# Save this code in a file named advancedexamplesraw.sh and place it in your home directory.
#
# To run this code just open a terminal in your home directory and run:
# bash advancedexamplesraw.sh
#
# You can run each of the examples individualy by passing in the following command line arguments:
# 'RTIA' for raw transaction using an issued asset
# 'RIA' for raw issuance of an asset
# For example, to run the raw issuance example only:
# bash advancedexamplesraw.sh RIA
#
# If you do not pass an argument in, both examples will run.
#
# If you want to run some of the steps automatically and then have execution stop
# and wait for you to press enter before continuing one line at a time: uncomment
# and move the 'trap read debug' statement down so that it is above the line you want
# to stop at. Execution will run each line automatically and stop when that line is
# reached. It will then switch to executing one line at a time, waiting for you
# to press return before executing the next command.
#
# You will see that occasionally we will use the **sleep** command to pause execution.
# This allows the daemons time to do things like stop, start and sync mempools. You
# can probably decrease the sleeps without issue. The numbers used below are so a low
# powered machine like a Raspberry Pi can run without incident.
#

if [ "$1" != "" ]; then
    EXAMPLETYPE=$1
    echo "Running '$EXAMPLETYPE' example"
else
    EXAMPLETYPE="ALL"
    echo "Running all examples"
fi

##############################################
#                                            #
#  RESET CHAIN STATE AND SET UP ENVIRONMENT  #
#                                            #
##############################################

# RESET CHAIN STATE AND SET UP ENVIRONMENT >>>

shopt -s expand_aliases

# Before running this script, change the following variables to point to: your local Elements binaries directory, the directory you'll use to store node data (note that the script will delete the $DATA_DIR/elementsregtest directory when run, so back up anything you might already have in there before running).

ELEMENTS_DIR="$HOME/elements"
DATA_DIR1="$HOME/elementsdir1"
DATA_DIR2="$HOME/elementsdir2"

BINDIR="$ELEMENTS_DIR/src"

alias e1-dae="$BINDIR/elementsd -datadir=$DATA_DIR1 -validatepegin=0 -chain=elementsregtest -daemon=1"
alias e1-cli="$BINDIR/elements-cli -datadir=$DATA_DIR1 -chain=elementsregtest"

alias e2-dae="$BINDIR/elementsd -datadir=$DATA_DIR2 -validatepegin=0 -chain=elementsregtest -daemon=1"
alias e2-cli="$BINDIR/elements-cli -datadir=$DATA_DIR2 -chain=elementsregtest"

# Ignore error
set +o errexit

# The following lines may error without issue if the daemons are not already running
e1-cli stop
e2-cli stop
sleep 15

# The following lines may error without issue
rm -r $DATA_DIR1 ; rm -r $DATA_DIR2
mkdir $DATA_DIR1 ; mkdir $DATA_DIR2

cp $ELEMENTS_DIR/contrib/assets_tutorial/elements1.conf $DATA_DIR1/elements.conf
cp $ELEMENTS_DIR/contrib/assets_tutorial/elements2.conf $DATA_DIR2/elements.conf

e1-dae
e2-dae

sleep 10

# Create the default wallets for each node
e1-cli createwallet ""
e2-cli createwallet ""
# Call rescanblockchain so the nodes are aware the new wallets can access the initial free coins set within the config files
e1-cli rescanblockchain
e2-cli rescanblockchain


# Wait for e1 node to finish startup and respond to commands
until e1-cli getwalletinfo
do
  echo "Waiting for e1 to finish loading..."
  sleep 2
done

# Wait for e2 node to finish startup and respond to commands
until e2-cli getwalletinfo
do
  echo "Waiting for e2 to finish loading..."
  sleep 2
done

# Exit on error
set -o errexit

ADDRGEN1=$(e1-cli getnewaddress)

e1-cli sendtoaddress $(e1-cli getnewaddress) 21000000 "" "" true
e1-cli generatetoaddress 101 $ADDRGEN1
sleep 5

# <<< RESET CHAIN STATE AND SET UP ENVIRONMENT


###########################################
#                                         #
#  RAW TRANSACTION USING AN ISSUED ASSET  #
#                                         #
###########################################

# RAW TRANSACTION USING AN ISSUED ASSET >>>

if [ "RTIA" = $EXAMPLETYPE ] || [ "ALL" = $EXAMPLETYPE ] ; then

    # Issue an asset and get the asset hex so we can send some
    ISSUE=$(e1-cli issueasset 100 1)

    ASSET=$(echo $ISSUE | jq -r '.asset')

    # Check the asset shows up in our wallet
    e1-cli getwalletinfo

    # Get a list of unspent we can use as inputs - referenced via transaction id, vout and amount
    UTXO=$(e1-cli listunspent 0 0 [] true '''{"''asset''":"'''$ASSET'''"}''')

    TXID=$(echo $UTXO | jq -r '.[0].txid' )
    VOUT=$(echo $UTXO | jq -r '.[0].vout' )
    AMOUNT=$(echo $UTXO | jq -r '.[0].amount' )

    # Get an address to send the asset to - we'll use unconfidential
    ADDR=$(e1-cli getnewaddress)

    VALIDATEADDR=$(e1-cli validateaddress $ADDR)

    UNCONADDR=$(echo $VALIDATEADDR | jq -r '.unconfidential')

    # Build the raw transaction (send 3 of the asset)
    SENDAMOUNT="3.00"

    RAWTX=$(e1-cli createrawtransaction '''[{"''txid''":"'''$TXID'''", "''vout''":'$VOUT', "''asset''":"'''$ASSET'''"}]''' '''[{"'''$UNCONADDR'''":'$SENDAMOUNT'}]''' 0 false)

    # Fund the tx
    FRT=$(e1-cli fundrawtransaction $RAWTX)

    # blind and sign the tx
    HEXFRT=$(echo $FRT | jq -r '.hex')

    BRT=$(e1-cli blindrawtransaction $HEXFRT)

    SRT=$(e1-cli signrawtransactionwithwallet $BRT)

    HEXSRT=$(echo $SRT | jq -r '.hex')

    # Send the raw tx and confirm
    TX=$(e1-cli sendrawtransaction $HEXSRT)

    e1-cli generatetoaddress 101 $ADDRGEN1
    sleep 5

    # Decode the raw transaction so we can see the amount of the asset sent and the address it went to
    GRT=$(e1-cli getrawtransaction $TX)

    DRT=$(e1-cli decoderawtransaction $GRT)

    echo "An amount of" $SENDAMOUNT "of the '"$ASSET"' asset was sent to address '"$UNCONADDR"'"

    echo "END OF 'RTIA' EXAMPLE"

fi
# <<< RAW TRANSACTION USING AN ISSUED ASSET


###########################################
#                                         #
#             RAW ISSUE ASSET             #
#                                         #
###########################################

# RAW ISSUE ASSET >>>

if [ "RIA" = $EXAMPLETYPE ] || [ "ALL" = $EXAMPLETYPE ] ; then

    # Get an address to issue the asset to...
    ASSET_ADDR=$(e1-cli getnewaddress "" legacy)

      # Get an address to issue the reissuance token to...
    TOKEN_ADDR=$(e1-cli getnewaddress "" legacy)

    # Create the raw transaction and fund it
    RAWTX=$(e1-cli createrawtransaction '''[]''' '''[{"''data''":"''00''"}]''')
    FRT=$(e1-cli fundrawtransaction $RAWTX)
    HEXFRT=$(echo $FRT | jq -r '.hex')

    # Create the raw issuance
    RIA=$(e1-cli rawissueasset $HEXFRT '''[{"''asset_amount''":33, "''asset_address''":"'''$ASSET_ADDR'''", "''token_amount''":7, "''token_address''":"'''$TOKEN_ADDR'''", "''blind''":false}]''')

    # The results of which include...
    HEXRIA=$(echo $RIA | jq -r '.[0].hex')
    ASSET=$(echo $RIA | jq -r '.[0].asset')
    ENTROPY=$(echo $RIA | jq -r '.[0].entropy')
    TOKEN=$(echo $RIA | jq -r '.[0].token')

    # Blind, sign and send the transaction that creates the asset issuance...
    BRT=$(e1-cli blindrawtransaction $HEXRIA true '''[]''' false)

    SRT=$(e1-cli signrawtransactionwithwallet $BRT)

    HEXSRT=$(echo $SRT | jq -r '.hex')

    ISSUETX=$(e1-cli sendrawtransaction $HEXSRT)

    e1-cli generatetoaddress 101 $ADDRGEN1
    sleep 5

    # Check that worked...
    e1-cli getwalletinfo

    e1-cli listissuances

    echo "END OF 'RIA' EXAMPLE"

fi

# <<< RAW ISSUE ASSET

# CLOSE RUNNING NODES BEFORE EXIT:

e1-cli stop
e2-cli stop
sleep 10

echo "Completed without error"
Example 2: Issuing an asset to a multi-sig, spending from a multi-sig and reissuing from a multi-sig.
The code below shows you how to carry out the following actions within Elements:
-
Create multi-sig addresses and issue an asset and its reissuance token to them.
-
Spend the asset from a multi-sig.
-
Reissue an asset using a reissuance token in a multi-sig.
Save the code below in a file named advancedexamplesmulti.sh and place it in your home directory.
To run the code, open a terminal in your $HOME directory and run:
bash advancedexamplesmulti.sh
Note: The script contains instructions telling you how to prepare the script before running.
#!/bin/bash
set -x

# This script will create a multi-signature address shared between Wallet 1 and Wallet 2 and issue a new asset to the address. The asset can then only be spent and reissued by Wallet 1 and Wallet 2 signing the spending/reissuance transaction.

####################    BEFORE RUNNING THIS SCRIPT    ####################

# -----
#   1
# -----

# Before running this script, change the following variables to point to: your local Elements binaries directory, the directory you'll use to store node data (note that the script will delete the $DATA_DIR/elementsregtest directory when run, so back up anything you might already have in there before running).

BINARY_DIR="$HOME/elements/src"
DATA_DIR="$HOME/elementsdir1"

# -----
#   2
# -----

# Create the directory referenced in DATA_DIR, if it is not already there.
# Within that directory, create a file named elements.conf, if it is not already there.
# Add/set the following as the contents of the elements.conf file (remove the # characters).

#daemon=1
#chain=elementsregtest
#elementsregtest.wallet=wallet
#elementsregtest.wallet=wallet_1
#elementsregtest.wallet=wallet_2
#elementsregtest.wallet=wallet_3
#validatepegin=0
#initialfreecoins=2100000000000000

# The settings will run the daemons in regtest mode, allocate some initial funds and create the required wallets.
# We will use the 4 wallets to:
#
# wallet (w-cli)
# Generate blocks and allocate initial funds
#
# wallet_1 (w1-cli) and
# wallet_2 (w2-cli)
# Create and sign multi-signature asset spends (and associated tokens)
#
# wallet_3 (w3-cli)
# Receive assets (single-signature receive)

# ------
#  Tips
# ------

# You will see that occasionally we will use the **sleep** command to pause execution.
# This allows the daemons time to do things like stop, start and create the wallets. You
# can probably decrease the sleeps without issue. The numbers used below are so a low
# powered machine like a Raspberry Pi can run without incident.

# Uncomment and move the following line to any point in the script to stop execution and then continue execution line-by-line by pressing enter.
#trap read debug


####################    SCRIPT PREPARATION    ####################

# Create some aliases to make calling the node/wallet easier
shopt -s expand_aliases
# Node
alias n-dae="$BINARY_DIR/elementsd -datadir=$DATA_DIR"
# Client wallets
alias w-cli-no-wallet="$BINARY_DIR/elements-cli -datadir=$DATA_DIR"
alias w-cli="$BINARY_DIR/elements-cli -datadir=$DATA_DIR -rpcwallet=wallet"
alias w1-cli="$BINARY_DIR/elements-cli -datadir=$DATA_DIR -rpcwallet=wallet_1"
alias w2-cli="$BINARY_DIR/elements-cli -datadir=$DATA_DIR -rpcwallet=wallet_2"
alias w3-cli="$BINARY_DIR/elements-cli -datadir=$DATA_DIR -rpcwallet=wallet_3"

# We will hash using sha256sum if available, openssl otherwise (other options are available)
which sha256sum >/dev/null 2>&1 && alias sha256hash="sha256sum | sed 's/ .*//g'" || alias sha256hash="openssl dgst -sha256 | sed 's/.*= //g'"


# The following 'create_multisig' function will be called within the script to create the multisig addresses for the:
# - Asset Issuance
# - Asset Reissuance Token
# - Issuance change
# - Asset Reissuance
# - Tokens in Reissuance
# - Token Reissuance change.

create_multisig () {
    # Accepts one argument - a label for the multi-signature address to be created
    local LABEL=$1

    # Get an address from wallet 1 and wallet 2 which we will later use to create a multi-sig
    # Wallet 1's Address for the multi-sig:
    ADDRESS_1=$(w1-cli getnewaddress $LABEL)
    ADDRESS_1_INFO=$(w1-cli getaddressinfo $ADDRESS_1)
    ADDRESS_1_PUBKEY=$(echo $ADDRESS_1_INFO | jq -r '.pubkey')
    # We wil use the confidential key from Wallet 1's address to create a blinded address later:
    ADDRESS_1_CONF_KEY=$(echo $ADDRESS_1_INFO | jq -r '.confidential_key')
    # We will use the blinding key for Wallet 1's address and import it later so Wallet 1 and Wallet 2 can subsequently see unblinded details
    BLINDING_KEY=$(w1-cli dumpblindingkey $ADDRESS_1)

    # Wallet 2's Address for the multi-sig:
    ADDRESS_2=$(w2-cli getnewaddress $LABEL)
    ADDRESS_2_INFO=$(w2-cli getaddressinfo $ADDRESS_2)
    ADDRESS_2_PUBKEY=$(echo $ADDRESS_2_INFO | jq -r '.pubkey')

    # Create a multi-sig '2 of 2' address (n of m, where m is the number of public keys provided)
    N=2
    MULTISIG=$(w1-cli createmultisig $N '''["'''$ADDRESS_1_PUBKEY'''", "'''$ADDRESS_2_PUBKEY'''"]''')
    MULTISIG_ADDRESS=$(echo $MULTISIG | jq -r '.address')
    REDEEM_SCRIPT=$(echo $MULTISIG | jq -r '.redeemScript')

    # Blind the multi-sig address using the confidential key from Wallet 1 that we stored earlier
    BLINDED_ADDRESS=$(w1-cli createblindedaddress $MULTISIG_ADDRESS $ADDRESS_1_CONF_KEY)

    # Import the redeem script, blinded address, and the blinding key for the blinded address into both wallets
    w1-cli importaddress $REDEEM_SCRIPT '' false true
    w1-cli importaddress $BLINDED_ADDRESS "$LABEL multisig" false
    w1-cli importblindingkey $BLINDED_ADDRESS $BLINDING_KEY
    w2-cli importaddress $REDEEM_SCRIPT '' false true
    w2-cli importaddress $BLINDED_ADDRESS "$LABEL multisig" false
    w2-cli importblindingkey $BLINDED_ADDRESS $BLINDING_KEY

    # Return the blinded address and the public key to the function caller (will be extracted by splitting on '|' by the caller)
    echo "$BLINDED_ADDRESS|$ADDRESS_1_PUBKEY"
}


####################    ENVIRONMENT PREPERATION    ####################

# First clear the existing chain data and wallets
# The following lines may error without issue if the node is not already running or the directory does not already exist

# Ignore error
set +o errexit

w-cli-no-wallet stop
echo "Wait for the node to stop if it was running..."
sleep 20

echo "Delete the data directory if it exists..."
rm -r $DATA_DIR/elementsregtest

# Start the daemon
n-dae
sleep 10

w-cli-no-wallet createwallet "wallet"
w-cli-no-wallet createwallet "wallet_1"
w-cli-no-wallet createwallet "wallet_2"
w-cli-no-wallet createwallet "wallet_3"
w-cli rescanblockchain

# Wait for node to finish loading all wallets and respond to command to get new address
until ADDRGEN1=$(w-cli getnewaddress)
do
  echo "Waiting for node to finish loading wallets..."
  sleep 2
done

# Exit on error
set -o errexit

# Create an address to generate to
ADDRGEN1=$(w-cli getnewaddress)

# Move some funds to Wallet 1
W1_ADDR=$(w1-cli getnewaddress)
w-cli sendtoaddress $W1_ADDR 1000
w-cli generatetoaddress 1 $ADDRGEN1
w1-cli getbalance "*" 0 true


####################    MULTI-SIG ISSUANCE    ####################

ASSET_AMOUNT="0.00000020"
REISSUANCE_TOKEN_AMOUNT="0.00000005"
# You may need to change the fee rate depending on the environment you run it in:
FEERATE="0.00003000"

# Create multi-sig address for the asset
CREATE=$(create_multisig "asset")
MULTISIG_ASSET_ADDRESS="$(echo $CREATE | cut -d'|' -f1)"
PUBKEY="$(echo $CREATE | cut -d'|' -f2)"

# Create multi-sig address for the reissuance token

CREATE=$(create_multisig "reissuance")
MULTISIG_REISSUANCE_ADDRESS="$(echo $CREATE | cut -d'|' -f1)"

# Create the base transaction
BASE=$(w1-cli createrawtransaction '''[]''' '''[{"''data''":"''00''"}]''')

# Fund the transaction
FUNDED=$(w1-cli fundrawtransaction $BASE '''{"''feeRate''":'$FEERATE'}''')
FUNDED_HEX=$(echo $FUNDED | jq -r '.hex')

# Store vin txid and vout
DECODED=$(w1-cli decoderawtransaction $FUNDED_HEX)
PREV_TX=$(echo $DECODED | jq -r '.vin[0].txid')
PREV_VOUT=$(echo $DECODED | jq -r '.vin[0].vout')

# Create the contract for the asset. The hash of the contract will be used to generate the asset id.
CONTRACT_TEXT="Your contract text. Can be used to bind the asset to a real world asset etc."

CONTRACT_TEXT_HASH=$(echo -n "${CONTRACT_TEXT}" | sha256hash)

# Create the raw issuance (will not yet be complete or broadcast)
RAW_ISSUE=$(w1-cli rawissueasset $FUNDED_HEX '''[{"''asset_amount''":'$ASSET_AMOUNT', "''asset_address''":"'''$MULTISIG_ASSET_ADDRESS'''", "''token_amount''":'$REISSUANCE_TOKEN_AMOUNT', "''token_address''":"'''$MULTISIG_REISSUANCE_ADDRESS'''", "''blind''":false, "''contract_hash''":"'''$CONTRACT_TEXT_HASH'''"}]''')

# Store details of the issuance for later use
HEX_RIA=$(echo $RAW_ISSUE | jq -r '.[0].hex')
ASSET=$(echo $RAW_ISSUE | jq -r '.[0].asset')
TOKEN=$(echo $RAW_ISSUE | jq -r '.[0].token')
ENTROPY=$(echo $RAW_ISSUE | jq -r '.[0].entropy')

# Blind the issuance transaction
BLIND=$(w1-cli blindrawtransaction $HEX_RIA true '''[]''' false)

# Sign the issuance transaction (we only need sign with Wallet 1 - it is subsequent spends that will require multiple signatures)
SIGNED=$(w1-cli signrawtransactionwithwallet $BLIND)
HEX_SRT=$(echo $SIGNED | jq -r '.hex')
DECODED=$(w1-cli decoderawtransaction $HEX_SRT)

# Test the transaction's acceptance into the mempool
TEST=$(w1-cli testmempoolaccept '''["'$HEX_SRT'"]''')
ALLOWED=$(echo $TEST | jq -r '.[0].allowed')

# If the transaction is valid
if [ "true" = $ALLOWED ] ; then
    # Broadcast the transaction
    TXID=$(w1-cli sendrawtransaction $HEX_SRT)
    # Confirm the transaction
    w-cli generatetoaddress 101 $ADDRGEN1
    # Check the issuance can be seen by Wallet 1
    w1-cli listissuances
    # Wallet 2 won't be able to see the actual amounts just yet
    w2-cli listissuances
    # Import the issuance blinding key into Wallet 2 so it can
    ISSUANCE_BLINDING_KEY=$(w1-cli dumpissuanceblindingkey $TXID 0)
    w2-cli importissuanceblindingkey $TXID 0 $ISSUANCE_BLINDING_KEY
    # Now Wallet 2 will be able to see the amounts
    w2-cli listissuances
fi

# Check that both Wallet 1 and Wallet 2 see the asset and reissuance token in their balances
w1-cli getbalance "*" 0 true
w2-cli getbalance "*" 0 true


####################    MULTI-SIG SPEND    ####################

# Have Wallet 1 and Wallet 2 spend some of the asset held in the multi-sig by sending it to Wallet 3's single-signature address

AMOUNT="0.00000001"

# Get a receiving address from Wallet 3
RECEIVING_ADDRESS=$(w3-cli getnewaddress "receiving")

# Create a multi-sig address for Wallet 1 and Wallet 2 to receive asset change to
CREATE=$(create_multisig "change")
MULTISIG_ASSET_CHANGE_ADDRESS="$(echo $CREATE | cut -d'|' -f1)"

# Get a change address for the bitcoin return from transaction fee spend
BITCOIN_CHANGE=$(w1-cli getrawchangeaddress)

# Create the multi-sig spending transaction
RAW_TX=$(w1-cli createrawtransaction '''[]''' '''[{"'''$RECEIVING_ADDRESS'''":'$AMOUNT',"'''asset'''":"'''$ASSET'''"}]''' 0 false)

# Fund the transaction
FUNDED_RAW_TX=$(w1-cli fundrawtransaction $RAW_TX '''{"'''includeWatching'''":true, "'''changeAddress'''":{"'''bitcoin'''":"'''$BITCOIN_CHANGE'''", "'''$ASSET'''":"'''$MULTISIG_ASSET_CHANGE_ADDRESS'''"}}''')
FUNDED_HEX=$(echo $FUNDED_RAW_TX | jq -r '.hex')

# Blind the transaction
BLINDED_RAW_TX=$(w1-cli blindrawtransaction $FUNDED_HEX)

# Have Wallet 1 sign the transaction
SIGNED_RAW_TX=$(w1-cli signrawtransactionwithwallet $BLINDED_RAW_TX)
SIGNED_RAW_TX_HEX=$(echo $SIGNED_RAW_TX | jq -r '.hex')

# Have Wallet 2 sign the transaction
SIGNED_RAW_TX_2=$(w2-cli signrawtransactionwithwallet $SIGNED_RAW_TX_HEX)
SIGNED_RAW_TX_2_HEX=$(echo $SIGNED_RAW_TX_2 | jq -r '.hex')

# Test the transaction wil be accepted into the mempool
TEST=$(w1-cli testmempoolaccept '''["'$SIGNED_RAW_TX_2_HEX'"]''')
ALLOWED=$(echo $TEST | jq -r '.[0].allowed')

# If the transaction is valid
if [ "true" = $ALLOWED ] ; then
    # Broadcast the valid transaction
    TX=$(w1-cli sendrawtransaction $SIGNED_RAW_TX_2_HEX)
    # Confirm the transaction
    w-cli generatetoaddress 1 $ADDRGEN1
fi

# Check that Wallet 3 received the asset
w3-cli getbalance

# And the balance of Wallet 1 and Wallet 2 have changed
w1-cli getbalance "*" 0 true
w2-cli getbalance "*" 0 true


####################    MULTI_SIG REISSUANCE    ####################

# Reissue an asset using a reissunce token held by the multi-sig

# Create a multi-sig address to issue the asset to
CREATE=$(create_multisig "asset_reissuance")
MULTISIG_ASSET_REISSUANCE_ADDRESS="$(echo $CREATE | cut -d'|' -f1)"

# Create a multi-sig address for the token
CREATE=$(create_multisig "token_reissuance")
REISSUANCE_TOKEN_ADDRESS="$(echo $CREATE | cut -d'|' -f1)"

# Create a multi-sig address for the change
CREATE=$(create_multisig "token_reissuance_change")
REISSUANCE_TOKEN_CHANGE_ADDRESS="$(echo $CREATE | cut -d'|' -f1)"

# We'll reissue an amount we can spot easily later when balance checking wallets
AMOUNT="0.00700000"

REISSUANCE_TOKEN_AMOUNT="0.00000001"

BASE=$(w1-cli createrawtransaction '''[]''' '''[{"'''$REISSUANCE_TOKEN_ADDRESS'''":'$REISSUANCE_TOKEN_AMOUNT',"'''asset'''":"'''$TOKEN'''"}]''' 0 false)

BITCOIN_CHANGE=$(w1-cli getrawchangeaddress)

FUNDED=$(w1-cli fundrawtransaction $BASE '''{"'''feeRate'''":'$FEERATE', "'''includeWatching'''": true, "'''changeAddress'''": {"'''bitcoin'''": "'''$BITCOIN_CHANGE'''", "'''$TOKEN'''": "'''$REISSUANCE_TOKEN_CHANGE_ADDRESS'''"}}''')

FUNDED_HEX=$(echo $FUNDED | jq -r '.hex')

# Get information about the token's unspent output
UNSPENTS=$(w1-cli listunspent)

UTXO_COUNTER=0
UTXO_COUNT=$(echo $UNSPENTS | jq 'length')

while [ $UTXO_COUNTER -lt $UTXO_COUNT ]; do
  UTXO_ASSET=$(echo $UNSPENTS | jq -r '.['$UTXO_COUNTER'].asset')
  if [ $TOKEN = $UTXO_ASSET ] ; then
    UTXO_INFO_TXID=$(echo $UNSPENTS | jq -r '.['$UTXO_COUNTER'].txid')
    UTXO_INFO_VOUT=$(echo $UNSPENTS | jq -r '.['$UTXO_COUNTER'].vout')
    UTXO_INFO_ASSET_BLINDER=$(echo $UNSPENTS | jq -r '.['$UTXO_COUNTER'].assetblinder')
    break
  fi
  let UTXO_COUNTER=UTXO_COUNTER+1
done

# Get asset commitments
DECODED=$(w1-cli decoderawtransaction $FUNDED_HEX)
DECODED_VIN_COUNT=$(echo $DECODED | jq '.vin' | jq 'length')

REISSUANCE_INDEX=-1
ASSET_COMMITMENTS=""

VIN_COUNTER=0

while [ $VIN_COUNTER -lt $DECODED_VIN_COUNT ]; do
  TX_INPUT_TXID=$(echo $DECODED | jq -r '.vin['$VIN_COUNTER'].txid')
  TX_INPUT_VOUT=$(echo $DECODED | jq -r '.vin['$VIN_COUNTER'].vout')

  if [ $TX_INPUT_TXID = $UTXO_INFO_TXID ] && [ $TX_INPUT_VOUT = $UTXO_INFO_VOUT ]; then
    REISSUANCE_INDEX=$VIN_COUNTER
  fi

  UTXO_COUNTER=0
  while [ $UTXO_COUNTER -lt $UTXO_COUNT ]; do
    UNSPENT_TXID=$(echo $UNSPENTS | jq -r '.['$UTXO_COUNTER'].txid')
    UNSPENT_VOUT=$(echo $UNSPENTS | jq -r '.['$UTXO_COUNTER'].vout')
    UNSPENT_ASSET_COMMITMENT=$(echo $UNSPENTS | jq -r '.['$UTXO_COUNTER'].assetcommitment')

    if [ $TX_INPUT_TXID = $UNSPENT_TXID ] && [ $TX_INPUT_VOUT = $UNSPENT_VOUT ]; then
      if [ "$ASSET_COMMITMENTS" = "" ]; then
	ASSET_COMMITMENTS="\"$UNSPENT_ASSET_COMMITMENT\""
      else
	ASSET_COMMITMENTS="$ASSET_COMMITMENTS,\"$UNSPENT_ASSET_COMMITMENT\""
      fi
      break
    fi
    let UTXO_COUNTER=UTXO_COUNTER+1
  done

  let VIN_COUNTER=VIN_COUNTER+1
done

# Create the reissuance transaction using the UTXO info
REISSUANCE=$(w1-cli rawreissueasset $FUNDED_HEX '''[{"''input_index''":'$REISSUANCE_INDEX', "''asset_amount''":'$AMOUNT', "''asset_address''":"'''$MULTISIG_ASSET_REISSUANCE_ADDRESS'''", "''asset_blinder''":"'''$UTXO_INFO_ASSET_BLINDER'''", "''entropy''":"'''$ENTROPY'''"}]''')

REISSUANCE_HEX=$(echo $REISSUANCE | jq -r '.hex')

# Blind using the asset commitments we found
BLINDED_RAW_TX=$(w1-cli blindrawtransaction $REISSUANCE_HEX true [$ASSET_COMMITMENTS] false)

# Have Wallet 1 sign the transaction
SIGNED_RAW_TX=$(w1-cli signrawtransactionwithwallet $BLINDED_RAW_TX)
SIGNED_RAW_TX_HEX=$(echo $SIGNED_RAW_TX | jq -r '.hex')

# Have Wallet 2 sign the transaction
SIGNED_RAW_TX_2=$(w2-cli signrawtransactionwithwallet $SIGNED_RAW_TX_HEX)
SIGNED_RAW_TX_2_HEX=$(echo $SIGNED_RAW_TX_2 | jq -r '.hex')

# Test the transaction wil be accepted into the mempool
TEST=$(w1-cli testmempoolaccept '''["'$SIGNED_RAW_TX_2_HEX'"]''')
ALLOWED=$(echo $TEST | jq -r '.[0].allowed')

# If the transaction is valid
if [ "true" = $ALLOWED ] ; then
    # Broadcast the valid transaction
    TX=$(w1-cli sendrawtransaction $SIGNED_RAW_TX_2_HEX)
    # Confirm the transaction
    w-cli generatetoaddress 1 $ADDRGEN1
fi

# Check that worked as expected:
w1-cli getbalance "*" 0 true
w2-cli getbalance "*" 0 true

# Stop our node
w-cli stop
sleep 10

echo "Completed without error"
Example 3: Issuing an asset and using the contract hash argument to enable registration with the Blockstream Liquid Asset Registry.
Please refer to the Blockstream docs site to see how to create an asset, register it and prove ownership against a domain name.
You will need to update the following fields within the script before running it and check the path to your elementsd and elements-cli:
NAME
TICKER
DOMAIN
ASSET_AMOUNT
TOKEN_AMOUNT
PRECISION
Example 4: Verify an output’s asset and amount values using the blinding factors.
The Confidential Transaction feature blinds both the asset and the amount sent within a transaction’s outputs. Normally only the sender and receiver know how much of an asset, and which asset, has been sent in any relevant outputs.
In some cases the sender might want to share the unblinded details of the transaction with a third party, such as an auditor or user of a service. This can be done by the sender through the sharing of blinding factors. Each blinding factor applies to a particular output, so the sender can share data at a ‘per output’ level without exposing the values of all outputs in a transaction.
The example below shows you how to carry out the following actions:
-
Create a link to the Blockstream Explorer that unblinds an output’s asset and amount values.
-
Use a Python script to allow a third party to verify the asset and amount values using their own Elements node. This can be done if the third party do not want to trust the results from the Blockstream Explorer.
For our example we will be unblinding a transaction made on the live Liquid network (the default network in Elements) so that we can use the Blockstream Explorer’s ability to derive and display values using the blinding factors given.
We’ll also show how the libwally-core library can take the blinding factors and use then to unblind transaction data retrieved from an Elements node, so trust in the Explorer is not required.
We will use a transaction with two non-change outputs which was created using the Elements sendmany command.
Using Blockstream Explorer
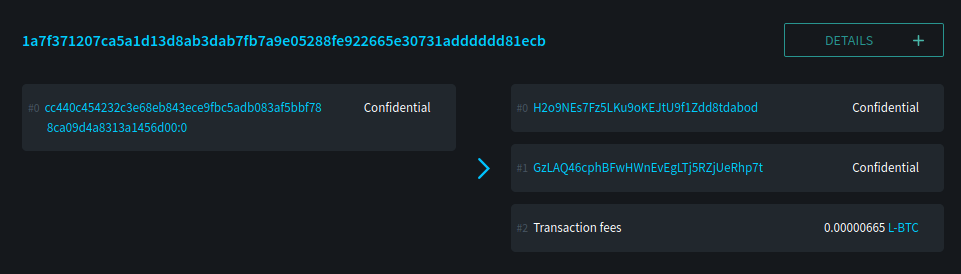
You can use the transaction ID to view the transaction we will be unblinding in the Blockstream Explorer. You can see that the amount and asset are blinded for each output (note that the fee is always unblinded in Elements):
https://blockstream.info/liquid/tx/1a7f371207ca5a1d13d8ab3dab7fb7a9e05288fe922665e30731adddddd81ecb
To allow somone to view the unblinded values via the Explorer, the sender first needs to get the transaction ID in question and use it to get the transaction details from their Elements node like:
elements-cli gettransaction <txid>
That will return data such as that shown below. Only relevant data (the outputs) are shown here:
"details": [
    {
      "address": "H2o9NEs7Fz5LKu9oKEJtU9f1Zdd8tdabod",
      "category": "send",
      "amount": -0.00000800,
      "amountblinder": "90fb24aab49dfd862e60161ae621f9dc9679f3197b55e6b1b7454155c94a1b7f",
      "asset": "6f0279e9ed041c3d710a9f57d0c02928416460c4b722ae3457a11eec381c526d",
      "assetblinder": "4f07afe0d712e80b91319eaadcb3401ee22e6f88caa1f0faadfd9ea7bc95abfe",
      "label": "",
      "vout": 0,
      "fee": 0.00000665,
      "abandoned": false
    },
    {
      "address": "GzLAQ46cphBFwHWnEvEgLTj5RZjUeRhp7t",
      "category": "send",
      "amount": -0.00000900,
      "amountblinder": "6ca03a3942ea11ccec276fe5750e2859fe53b33d0a840f71818161620682cca0",
      "asset": "6f0279e9ed041c3d710a9f57d0c02928416460c4b722ae3457a11eec381c526d",
      "assetblinder": "a00df580064426065097de14b92023b0da2e900f8607e42fade2da46235edf6b",
      "label": "",
      "vout": 1,
      "fee": 0.00000665,
      "abandoned": false
    },
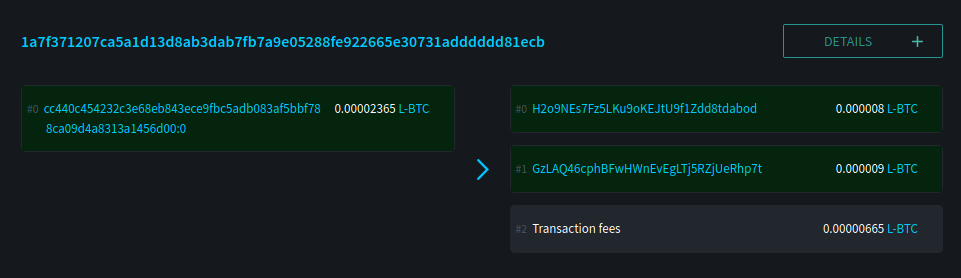
Taking the amount, asset, amountblinder, assetblinder from the above and passing it into the URL using the format below. You can provide multiple amount/asset/blinder values at once as we do below. The explorer will loop through each set and match to an output:
https://blockstream.info/liquid/tx/{txid}#blinded={amount},{asset_id},{amount_blinder},{asset_blinder},{amount2},{asset_id2},{amount_blinder2},{asset_blinder2}
Doing this with our example outputs we get a URL:
The Explorer uses the blinding factors to derive the actual amount and asset for each of the provided outputs:
Using the libwally-core library
Rather than trust the commitment proof provided by the Blockstream Liquid explorer above a user might want to run their own proof of commitments. They can do this using the verify-elements-commitments Python script, which itself uses Libwally, a cross-platform, cross-language collection of useful primitives for cryptocurrency wallets.
To run the verify-elements-commitments.py Python script the verifying party first needs to install the prerequisites. To do this they would follow the steps below:
From the terminal, create a folder to run the code from and move into it:
mkdir verify_elements_commitments
cd verify_elements_commitments
Then (optionally) initialize a Python virtual environment to install the requirements within:
virtualenv -p python3 venv
source venv/bin/activate
Into this environment you need to install libwally-core. The source code for libwally can be found in the Libwally repository but here will will use the pip install command:
pip install wallycore
Download the verify-elements-commitments.py file from:
https://github.com/Blockstream/verify-elements-commitments
Place the downloaded file in the verify_elements_commitments folder.
Get the relevant transaction hex from an Elements node.
elements-cli getrawtransaction <transaction_id>
So for our example you would run:
elements-cli getrawtransaction 1a7f371207ca5a1d13d8ab3dab7fb7a9e05288fe922665e30731adddddd81ecb
Save the results of the above to a new file named transaction.txt within the verify_elements_commitments folder.
The sender selects and saves the output blinders they are interested in, using the following format, and saves it to a file named blinders.json that they can provide to the verifying party:
{
    "inputs":[],
    "outputs":[
        {
            "asset_id_hex": "6f0279e9ed041c3d710a9f57d0c02928416460c4b722ae3457a11eec381c526d",
            "asset_blinder_hex": "4f07afe0d712e80b91319eaadcb3401ee22e6f88caa1f0faadfd9ea7bc95abfe",
            "amount_satoshi": 800,
            "amount_blinder_hex": "90fb24aab49dfd862e60161ae621f9dc9679f3197b55e6b1b7454155c94a1b7f"
        },
        {
            "asset_id_hex": "6f0279e9ed041c3d710a9f57d0c02928416460c4b722ae3457a11eec381c526d",
            "asset_blinder_hex": "a00df580064426065097de14b92023b0da2e900f8607e42fade2da46235edf6b",
            "amount_satoshi": 900,
            "amount_blinder_hex": "6ca03a3942ea11ccec276fe5750e2859fe53b33d0a840f71818161620682cca0"
        }
    ]
}
Now the issuer can execute the proof like this, using the transaction data from their own node and the blinders provided by the sender:
python verify-elements-commitments.py --tx transaction.txt --blinded blinders.json
Which, in our example case, will output:
{
  "txid": "1a7f371207ca5a1d13d8ab3dab7fb7a9e05288fe922665e30731adddddd81ecb",
  "inputs": [],
  "outputs": [
    {
      "vout": 0,
      "asset": "6f0279e9ed041c3d710a9f57d0c02928416460c4b722ae3457a11eec381c526d",
      "satoshi": 800
    },
    {
      "vout": 1,
      "asset": "6f0279e9ed041c3d710a9f57d0c02928416460c4b722ae3457a11eec381c526d",
      "satoshi": 900
    }
  ]
}
We’ve seen how a third party can use the verify-elements-commitments.py Python script to verify the the asset and amount values without having to trust the Blockstream Explorer’s implementation of the same process.